I have gone through quitee a few foundations since I started wearing makeup, and most of them are from a drugstore so are readily available to everyone who lives near a Boots or Superdrug, so as it got a few votes in the poll, here is a quick overview of my favourites :)
Quick note: Foundation isn't something I usually wear on it's own - no foundation will really achieve its full potential just slapped on your bare skin aha, it does take a little bit of effort to moisturise first and set it with powder afterwards for best results, but it's well-worth it! So if you're not getting the results you want out of a foundation maybe you're missing out a different step or are not using one suited to your skin tone (see blog post below!).
Anyway on with the overview!
Maybelline Dream Satin Liquid £8.19
Okay so this is my personal favourite atm, it's got a great buildable coverage and is very easy to blend. It makes your skin look flawless and covers up blemishes and evens out your skintone perfectly. What makes it special is the gorgeous satin finish, making you look glowy and fresh rather than one colour-matte which can make your skin look a bit dull. It's also really affordable and there are often 3for2 deals including this product.
L'oreal Paris True Match £10.29
This foundation is another great one to buy. It has different shades for warm, neutral and cool skin and it's super blendable and easy to build up. The 'true match' claim means that if your shade doesn't match your skin perfectly, the colour adjusts to match your skin better - any obvious colour seems to 'disappear' so it isn't obvious you're wearing foundation. The coverage is really good and makes your skin look flawless without feeling heavy on your skin.
Max Factor Second Skin Foundation £12.99
Another amazing product, the lightest shade of this foundation is recommended for pale skin, who can sometimes struggle to find a light enough shade. Once again this foundation is really blendable with great coverage for a flawless finish. It covers blemishes really well as it acts like a 'second skin', also great at covering up redness. Makes you skin look really smooth :) Only downside is there aren't many shades, but if a shade matches your skin well then i'd definitely recommend it!
Maybelline Dream Matte Mousse Foundation - £7.69
This is the most popular foundation in the market for a reason! It has a really good buildable coverage, with a matte finish making it an ideal base for other face makeup. However it can look powdery or obvious if you use too much, and IT IS NO GOOD ON DRY SKIN. So if you have dry skin be warned, it shows up dry patches like a bitch and 'sticks' to them...not a good look. Moisturising before using this foundation is really important aha, and for most people this foundation is great if you're on a budget :)
Soo that's a quick overview of my favourite drugstore foundations, hope it was useful!♥
Have a great Christmas! xoxo
Friday 24 December 2010
Monday 20 December 2010
Understanding skin types & undertones
Skin is not just Skin. Well, it is - but you can examine and define it in much more detail aha.
Everyone has a skin type and different colour undertones to their skin - and knowing these will help you to buy the best products for your skin, and match the right shade of foundation!
Part 1: Skin Types
Combination Skin
This is the most common skin type; being oily in some places and dry in others. Often the T-zone (forehead and nose) gets oily and the cheeks may develop dry patches, especially in winter.
When it comes to makeup, common problems experienced with combination skin are an oily T-zone after a few hours, or a few dry patches showing up under foundation.
A foamy cleanser is ideal to use in the mornings for this skin type - I have this skin and use a lightly exfoliating face wash which is good. A light moisturiser should be used all over combination skin in the morning, with most of the focus on drier areas. Any face makeup should be set with a powder, and pressed powder used on the T-zone to prevent oilyness. Mineral makeup is a great option if you only want a light coverage, as it contains natural pigments which should not irritate either dry or oily patches of skin.
Oily Skin
Oily skin often feels greasy all over and gets shiny very quickly. It also is prone to spots all over and pores are often quite large and visible.
It's an easy mistake to choose a strong, exfoliating cleanser to use on oily skin to try and keep it under control but this can do more bad than good if used regularly - it strips away all the moisture from your face. For a daily cleanser, a foaming facial wash is reccomended. You still must use a moisturiser! But stick to lighter watery moisturisers. When it comes to any makeup or facial products steer clear of any oil-based products, choosing water based products instead. A mattifying primer or pore minimiser makes a good base for makeup, and powder foundations will absorb oil well. It's also a good idea to have oil blotting sheets with you at all times! (can be bought from Mac, the Body Shop etc) These can be used throughout the day to absorb excess oil.
Dry Skin
Dry skin feels tight after washing and flaky patches may appear (especially under foundations). Also prone to redness.
A gentle creamy cleanser is ideal for dry skin. A thick moisturiser should be used before applying makeup and also overnight to leave skin soft and nourished. Allow plenty of time for the moisturiser to fully absorb before apply further products, otherwise it's effects are lost! As for makeup, liquid foundations may be most suitable - you can mix these with moisturiser as well if needed. Stay away from mousse foundations (Dream matte mousse = avoid at ALL costs for dry skin! shows up dry patches like a bitch aha). Some powder foundations also tend to 'stick' to dry patches so it may be a good idea to avoid them.
Sensitive Skin
Sensitive skin can be super-awkward at times, with it's unpredictable ways - but if you know how to handle it it makes life that little bit easier.
Products with fragrances or preservatives can often irritate sensitive skin. Search for fragrance-free products and those with more natural ingrediants so to lessen the chance of developing a rash. Also look for 'hypoallergenic' makeup, as this means it is developed to be less likely to cause an allergic reaction. Powder foundations are reccomended over liquids, as they tend to contain less preservatives - but if you're hooked on liquid foundation try to buy foundations with silicone in them as this is known for not irritating the skin. It is important to throw away makeup once it reaches the end of its life span (foundation: 6 months, mascara: 3-6 months, powders:1-2 years) as by this stage it often contains many bacteria which can irritate your skin.
Nowadays there are so many varieties of skincare and makeup out there, you may have to try a few products before you find your HG foundation/powder/whatever! Experimenting with lots of different products will be worth all the effort and money once you find what you're looking for, so don't settle for second best!
Also there are many skincare ranges and makeup products out there now dedicated to specific skin types so they may be worth a try - but don't ignore other products which don't include your skin type in the name because you could miss out.
Hope this post was useful :)
I will post Part 2 - Understanding Undertones within the next few days
x
Saturday 4 December 2010
101 things in 1001 days project
Okay first of all SORRY, because this is really off-topic and I will post again something relevant soon I PROMISE.
BUT,
you should totally check out this site:
http://dayzeroproject.com/
You can sign up in about 30 seconds and create a list of 101 things you want to do/achieve in 1001 days.
It also provides loads of ideas for you and you can track your progress etc.
I've just started making my list, you totally should too! [And tell me if you, it's on my list to influence someone else to join aha]
http://dayzeroproject.com/user/Jasminexo
xo
Tuesday 2 November 2010
Quick note: Poll & Blog Suggestions
Heyyy just a quick note to say I've put up a poll > > >
And you should vote in it ahaa, because I don't really know what people want to read atm?
You can select multiple answerss, so go ahead :D
Alsoo I have a formspring if you want to write down any other suggestions or ask me anythingg♥
http://www.formspring.me/jasminechelseax
Love youu
xo
And you should vote in it ahaa, because I don't really know what people want to read atm?
You can select multiple answerss, so go ahead :D
Alsoo I have a formspring if you want to write down any other suggestions or ask me anythingg♥
http://www.formspring.me/jasminechelseax
Love youu
xo
Tuesday 26 October 2010
Coloured tip nails :)
Sooo i thought i'd do a little post on one of my fave easy mani's to do
It basically involves leaving most of your nail nude and painting cute coloured tips to make them pop :)
So here's how:
1) After applying a clear base coat, paint a few coats of a colour which is similar to your skin for a mannequin-hands effect. I use OPI Samoan Sand :) You could skip this stage and just use your natural nail colour as the base but I like the ultra-nude look Samoan Sand gives me :)
2) Leave the base colour to dry for a good amount of time (so if you're using nail guides they will not pull off some of the polish when you take them of). Then, using nail tip guides (or free hand if you dare!), paint a layer of colour on the tips.
3) Leave to dry and wack on a top coat to keep it looking glossy and chip-free, and ta-dah you are done!!
Here are some of my favs, purple (fav colour ever!) and hot pink:
(Not gunna lie these are very messy, did the purple free-hand in a hotel room with my nails in the worst condition they have EVER EVER been because surfing destroyed them so bad ;/ BUT WHATEVER :))


Samoan sand looks two totally different colours in these photos, it's more like the first not sure why it appeared so dark in the second set of photos but ohwell :)
Hopee you like!
xo
Thursday 21 October 2010
Cleaning clip-in hair extensions
A while back I posted about my clip-in hair extensions - click here to see the original post - and I thought I would do a post about how to maintain your hair extensions and keep them looking nice and healthy so you can use them for longer :)
When many people think of hair extensions, especially the clip-in variety, it conjures up images of ratty, scraggly strips of obviously artificial hair, -shudder-, but by buying good quality real hair extensions and taking good care of them you can do your bit to help stop this prejudice!! And generally have some better looking extensions aha, which I suppose is probably the main reason you're here :')
My method of washing extensions is quite, erm, thorough as i'm a bit OCD about them looking nice and stuff - some people just shampoo and condition like normal but as extensions aren't attached to your head and so have no way of getting your natural oils they tend to dry out a lot more, so imo normal washing isn't really sufficient for them. Extensions tend to dry out rather than get greasy.
Q&As at the bottom of the post!
So lets get started :)
1) First of all, comb your extensions so they are smooth and have no knots. Fill your sink/bowl/whateveryourusing with lukewarm water and add some conditioner and mix it in. Then put your extensions in and leave to soak for 5 minutes.
2) Next gently rub a mild shampoo through your extensions, combing the product through with your fingers. Being gentle is vital as you don't want hairs to fall out - this will make them go scraggly more quickly. I tend to squeeze the product into the extensions rather than rub.
3) Rinse thoroughly with lukewarm water, then squeeze out excess water. Next put conditioner on. My conditioner is for coloured hair which will stop the colour fading, so no giveaways with a dodgy colour-match! Remember to use plenty of conditioner on the ends as this is the part that will dry out the most.
4) Rinse again and squeeze out excess water. Next apply a hair treatment or masque (Aussie 3 minute miracle deep conditioning treatment is fab!) and leave on for at least 10 minutes (I often leave it on for about 30-45)
5) Rinse off and squeeze again. Now lightly comb through your extensions and lay them out to dry (you can hang them from a shelf by pinning them down with a book or heavy object, or I spread mine out on a towel on my bed). Leave them to air dry as it is better for them than using heat. As they dry I tend to spritz them with a bit of leave in conditioner, focusing on the ends.
6) When dry, they may look a bit wavy or not how you want them, so just use heat to style them how you want. Then you're ready to clip-in and go!
Q: How often do clip-in hair extensions need washing?
A: Hair extensions should be washed when they are looking dry and perhaps a bit ratty, which is generally after 5-6 wears.
Q: Real hair or synthetic hair?
A: REAL HAIR ALL THE WAY. It may sound gross, but they are so so so much better than fake hair extensions, which are truely awful. They look and feel fake and plasticy, and tend to end up ratty and trashy no matter how good care you take of them.
Q: I wash mine regularly but they look really scraggly and bad?
All hair extensions are eventually going to look past their best, they're just no substitute for your own hair unfortunately! Taking good care of them really does help extend their life though :)
Q: Should you use heat protection or hairspray on clip-in hair extensions?
Sure! If you're worried about drying out or damaging them, you can use pretty much any product designed for your own hair on your extensions if they're made of real hair too. Don't overload them with products though as it might weigh them down or change the way they look for longer than you intended!
Hope I helped! Love for hair extensions♥
Thursday 30 September 2010
Half-moon manicure tutorial
This week I had to cut my nails drastically - they have been in awful condition since I went surfing on holiday and since then i've been covering up the damage with polish but they were all splitting and peeling and I couldn't hide the damage anymore so unfortunately they had to go :(
After leaving them nail polish-free for about 5 days I really couldn't stand the sight of my tiny 'naked' nails anymore aha...so i decided to paint them, and to make up for the previous plainess I wanted to make them more interesting with a half-moon (or reverse french) mani :)
Here's what I came up with: (before cleanup sorry aha)

I used:

OPI Rumple's Wiggin & Max Factor nailfinity 882 Angel Nails (metallic silver/purple colour)
How to do the half-moon manicure
1) Remove previous nail polish and apply a clear base coat
2) Once base coat is dry, apply the colour you want as the half-moon, so here I applied the metallic purple/silver colour from Max Factor. This is quite opaque so I only needed 1 coat, do more if you need to but try to use opaque colours otherwise you will end up with looads of layers of nail polish which will peel.
3) Wait about 15-20 minutes for this layer to dry completely, and then stick on nail guide stickers where you want the half-moon shape to be at the base of your nail. The sticker protects areas you want nail polish free. Here's a (pretty bad, sorry!) photo explaining what I mean:

4) Apply your main colour (here I used OPI Rumple's Wiggin which is a lilac) from the nail guide sticker upwards, and leave to dry. Once it is fully dry remove the sticker and apply a top coat to seal it :)
Tah-dah! You are done :D
I've tried doing it the other way around and putting the main colour on first, then using tips to draw on the half-moons but even with the tip guides this gets quite messy and it's difficult to get the right shape, so this technique works better!
There are soo many combos you can try out, google image 'half-moon manicure' for inspiration!
Thanks for reading!
What do you think of half-moon manis? What colour combinations do you like?
xo
Wednesday 22 September 2010
Glitter tip nails :)
A couple of weeks ago I had a glitter cravingg and decided to use loose glitter on the tips of my nails.
The process was extremely messy - there was literally glitter everywhere - but the result was worth it! Plus I was helping out at Rhythms of the World music festival that weekend putting wristbands on hundreds of people, so my nails got the best exposure ever!! ;D
Here are some pics (apologies for poor application and lack of cleanup!)


A blurred pic to show the glitter colours:

To do this manicure I started by applying a few coats of the base colour, Collection 2000 Hot Looks Fast Dry in Vogue (these nail polishes are really great and affordable)
After waiting about 10-20 minutes for the polish to be completely dry I stuck nail tip guides on my nails and put a clear top coat on the tips.
I then pressed the loose glitter onto my nails using my fingers. I tried sprinkling it on but it didn't stick as well and there was too much waste. This method was also quite messy but the glitter stuck amazingly and the manicure was perfectt for a good few days before chipping or major glitter fallout.
Once the tips had dried i removed the nail guides and painted 2 layers of clear topcoat on to ensure the glitter was well stuck down and it was not gritty.
I personally love this look but its far too much hassle to do on a regular basis!! Thank god for glitter polishes, I think I may use them to recreate this look again in the future aha :)
Have you ever tried using loose glitter on your nails? If so have you found an easier mess-free method? Let me know!♥
Sunday 19 September 2010
Giving my friend a makeover!♥
This weekend me, my twin sister Hazel and Bea decided to test out our styling skills by giving our friend Fiona a makeoverr :)
Hazel did the hair and I did the makeup, and she is wearing my dress/top from Primark as a top and Hazel's skirt from TopShop, and belt from idk where and bracelets from New Look :)
Here are some (quite dodgy) before shots:


And noww for the after shots!!


Ta-da!
Fee loved her new look and I hope you guys do too :))
Hair curlers used were Nicky Clarke
Makeup used:
No7 Tinted Moisturiser
Bare Escentuals Medium Beige (my powder but i use it for everyone as it is quite sheer and just warms the face up more)
Bronzer from ELF Blush and Bronzer Compact
ELF Mineral Blush in Coral
Eyeshadows from the ELF Mini Makeup Collection (the yellow/nude colour and the chesnut brown colour)
Antique Gold Barry M Dazzle Dust
Fiona's mascara, not sure what it was exactly but it was one of those dual mascaras
Unbranded gel liner (only used the tiniest bit)
Some of the ELF product swatches are avaliable here on an earlier post I did.
Ever given your friends a makeover? How did it go? :)
Hazel did the hair and I did the makeup, and she is wearing my dress/top from Primark as a top and Hazel's skirt from TopShop, and belt from idk where and bracelets from New Look :)
Here are some (quite dodgy) before shots:
And noww for the after shots!!
Ta-da!
Fee loved her new look and I hope you guys do too :))
Hair curlers used were Nicky Clarke
Makeup used:
No7 Tinted Moisturiser
Bare Escentuals Medium Beige (my powder but i use it for everyone as it is quite sheer and just warms the face up more)
Bronzer from ELF Blush and Bronzer Compact
ELF Mineral Blush in Coral
Eyeshadows from the ELF Mini Makeup Collection (the yellow/nude colour and the chesnut brown colour)
Antique Gold Barry M Dazzle Dust
Fiona's mascara, not sure what it was exactly but it was one of those dual mascaras
Unbranded gel liner (only used the tiniest bit)
Some of the ELF product swatches are avaliable here on an earlier post I did.
Ever given your friends a makeover? How did it go? :)
Thursday 5 August 2010
Nude lipstick swatches - Nyx and E.L.F
Today i'm posting comparison swatches of 3 nude lip colours - Nyx's Circe and Orange Soda and Eyes Lips Face 's (E.L.F's) Natural Nymph.
All these lipsticks are roughly the same price, which is very affordable - Natural Nymph is £3.50 and the Nyx colours vary prices depending where you buy them from but can be bought for roughly the same price if you're including P&P from Ebay.
Anyway here are swatches!

All have the same creamy finish.
Circe is a brown based nude. Looks less brown on. A good nude colour. I find it a bit boring/deadish on my skin though because I suit more warm colours. If Natural Nymph is too light for you then this would be a good alternative.
Orange soda is an orangey nude, looks less orange on the lips but does have a slight concealer-lips effect. Definately better for those with warm undertones.
Natural nymph is the perfect in the middle nude, imo. However it'd be better suited for lighter skin tones as it's too light for me and makes me look a bit dead. Blots out natural lip colour well.
Personally I only use these colours to blot out my natural lip colour before applying either a nude coloured gloss or another lip colour on top, and my colour of choice is Orange Soda as I have warm undertones and the other two are a bit lifeless on me. However im sure they could be worn alone if you really wanted, but they all look gorgeous with glosses over the top!!
What d'you think of nude lips? What are your favourite nude lip colours and glosses?
♥
Tuesday 3 August 2010
NYX round lipstick swatches :)
I ♥ the brand Nyx - they have good quality products for really affordable prices, similar to that of ELF, but there's more variety imo :)
Unfortunately it's a brand hard to come by in the UK :( But luckily there's a great Ebay seller who sells loads of their products for unbeatable prices and is more than happy to ship internationally. For your fix of nyx, check out joy017 haha :)
Click here to go to her Ebay shop
Anyway onto the swatches! I bought 6 of the round lipstick shades, but today i'm only swatching 4 of them, as 2 were nude colours (Orange Soda and Circe) and I will swatch them shortly alongside ELF's Natural Nymph so we can compare!

Tah-dah! Aren't they beautiful!♥
Tea Rose is a cute reddish-pink which I think suits the name perfectly :) It does come out a little darker on your lips but it's very pretty and elegant, it reminds me of posh tea parties haha. I think this would suit cooler toned people more though, or maybe i'm just too young to fully appreciate it aha. It is nicely pigmented and has a satin finish.
Harmonica is a veryy frosty light pink which is actually pretty sheer (probably something to do with the finish; I found the same thing with Darling). My lips are quite dark naturally so it looked a bit funny on me and I think would suit people with less pigmented lips, but it looked nice when I used foundation to blot out my lip colour first + added a light pink sparkly lipgloss ;D
Darling is again frosty and sheer, and also has lots of sparkles in it, I found. It's a kinda brown/beige/bronze colour but it didn't do much for me; I tried putting it on my au naturale lips and foundation-lips and it just didn't really show up. Guess it's to do with my darkish lips though, not sure what it would look like on other skin tones.
INDIAN PINK - this is my new all time fav lip stick! I wore this to prom it's gorgeous :) A nice corally pink with gold shimmery undertones = utterly beautiful and reminds me of a pink Indian sari with gold embroidery and jewellery. Very nicely pigmented too!
All the lip sticks are very creamy and have the same taste which is quite nice imo but if you don't like it then it's not a problem as it wears off in a matter of minutes. I will definately be buying more, might steer clear of the frosty finish's though.
Do you own any products from Nyx? What do you think of them?
NYX Orange Soda & Circe & E.L.F Natural Nymph swatches coming soon!
Tuesday 20 July 2010
Recent nails :)
Heyy, just thought i'd do a quick post on some recent nails i've been wearing :)
First of all I chose an electric blue colour from La Femme Beauty as a base (3 coats), and painted a silver glitter nail polish over the top.

This created quite a cute effect and was pretty simple, it looked a bit grainy but a top coat evened it out :)
Next I decided to delve a bit into the world of nail art aha, I started with 2 coats of a grey base and then added white tips, which I painted the silvery glittery polish I used in my previous post on top of (the white made it stand out more). Then I drew a cute line to cover up the division using my neon pink 2 way nail art pen :).

Colours look kinda naff in this photo, the silver is much more silvery and glittery in real life and the pink much more vibrant :)
I know it's not much but I don't think it's too shabby for a first nail art attempt, if i may say so myself!
Anyway I hope you enjoyed this post! Next post will be something un nail-related, I promise aha :)
Hope you're all having a good summer so far ♥
Friday 11 June 2010
NOTD - Romantic♥
Today i was bored and decided to do something fun with my nails :)
I found a cute silverly glitter nail polish in my collection (unbranded) and used some heart gems I got from ebay (link here).


(Gems are more red inrl)
I love these nails they are so cute♥
Don't think the gems will last very long though, hopefully a few days but we'll see :)
I really need some cute new polishes for summer, i'm thinking a pastel lilac colour and a cool aquamarine or sky blue :)
What colours are you loving for summer? ☼
Saturday 9 January 2010
My favourite hair products atm!
Heyy guys sorry haven't posted in a while, gone back to school this week and even though I had 2 days off due to the snow (woo!) I haven't got round to doing any posts! Sorry!
This post is about my fave hair products atm, starting with John Freida Frizz-Ease Straight Fixation Smoothing Creme (phew that's a mouthful lol!). I apply this onto my towel-dried hair and then blow dry and straighten, and it goes straight really easily (super straight after blow drying, I just like to straighten it too so it's poker straight haha!) and it feels so silky and smells soo good, kinda apple-y, and shines really nicely, and no frizz!
I do have pretty straight hair naturally, but when I want to straighten my hair this product is great. It keeps your hair straightener-straight for agees, mine lasted 2 days
then I washed it lol. Available in Boots for £4.99
The next product I laave atm is the Aussie 3 Minute Miracle Colour Deep Treatment. I've been using it after shampooing in place of my conditioner and it has such amazin g results! First of all it smells delicious and peachy, and it makes your hair reallyyy soft and silky and, well, conditioned! It claims to 'replenish and revitalise your colour' but I didn't really notice much change in my hair colour vibrancy, although looking at some of the reviews it appears it works better once left on for longer than 3 minutes - leaving it on for 10 or 20 minutes are recommended. I'll try this out sometime haha. It is a fantastic product though, the conditioning can't be beaten for such an amazing price, that's for sure! I got this for £4.88 at Boots.
Next up is L'oréal Elnett Satin Very Volume Supreme Hold Hairspray. I have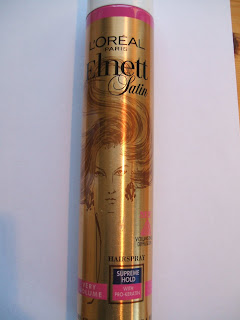 the 400ml one and it is HUGE, will last for ages aha. I've only used this a few times since I got it, and I have to say i'm liking it a lot! It holds volume really well, which is useful because my hair sometimes is soo flat and I often use volumising products on it and want them to last! Also it isn't really heavy and doesn't make your hair feel all greasy and weighed down, it's quite light and soft. It brushes out really easily too, and holds your hair in place naturally - it doesn't look stiff or like it's got any product in it at all! It comes in various sizes, so check out the smaller ones if you feel like testing it out, and is available at Boots (where else haha? I love Boots!).
Next let me introduce another of my favourite hair products - the Vo5 Heat Defence Taming Spray! Protecting your hair against heat is very important to prevent damage, and I find myself reaching for this product the most when it comes to straightening or blow drying my hair. It is a fine mist which doesn't dampen your hair, meaning no horrible *hissss* or burning smell once you put your straightening iron to your hair, and it keeps your hair feeling very light and like you've not got any hair products on. There's nothing worse than your hair feeling bogged-down by tonnes of product so I love anything that's light, especially as I do like to use a fair few products on my hair haha. This product also makes your hair look sleek and shiny, and reduces frizz.
Next up is one of my ultimate favourite products...which I think has been discontinued :(
The reason i'm posting it is because it is amazinggg, and if any of you guys know where to get this product then please let me know lol!! I'm running out and it's making me depressed :(
Anyway the product is called Citré Shine Shine Miracle Polishing Serum. It smells SO gorgeous and citrus-y and I apply a bit to my towel-dry hair after coming out the shower and it makes it smooth, sleek, glossy, shiny, totally frizz-free and makes my hair look and feel (and smell!) so healthy and good <3

The last product i'm going to mention is the Vo5 Extreme Style Surf Style Spray 1 50ml. I went surfing in Devon and Cornwall this summer and loved the natural beach-waves and texture of my hair after surfing all day, it looked so cute down or up in a messy bun and plaited back fringe/bangs. I saw this product in Boots and decided to try it out! I'm so glad I did, because the texture it gives your hair is PERFECT beach-blown, wind-swept style, thanks to the sea salt in the product it feels like the real thing to me aha, perfect way to remind me of the summertime all year round :)
This product works really well on curled hair to make it really messy waves, or natural hair for lots of volume and a bit wavy (well on naturally straight hair that is, on wavy hair it'd look gorgeous!). This was £3.22
Well that's all for now!
Hope you enjoyed the post, and do you have any hair product recommendations? Comment with them below, i'd love to hear!! :)
This post is about my fave hair products atm, starting with John Freida Frizz-Ease
 Straight Fixation Smoothing Creme (phew that's a mouthful lol!). I apply this onto my towel-dried hair and then blow dry and straighten, and it goes straight really easily (super straight after blow drying, I just like to straighten it too so it's poker straight haha!) and it feels so silky and smells soo good, kinda apple-y, and shines really nicely, and no frizz!
I do have pretty straight hair naturally, but when I want to straighten my hair this product is great. It keeps your hair straightener-straight for agees, mine lasted 2 days
then I washed it lol. Available in Boots for £4.99
The next product I laave atm is the Aussie 3 Minute Miracle Colour Deep Treatment. I've been using it after shampooing in place of my conditioner and it has such amazin
 g results! First of all it smells delicious and peachy, and it makes your hair reallyyy soft and silky and, well, conditioned! It claims to 'replenish and revitalise your colour' but I didn't really notice much change in my hair colour vibrancy, although looking at some of the reviews it appears it works better once left on for longer than 3 minutes - leaving it on for 10 or 20 minutes are recommended. I'll try this out sometime haha. It is a fantastic product though, the conditioning can't be beaten for such an amazing price, that's for sure! I got this for £4.88 at Boots.
Next up is L'oréal Elnett Satin Very Volume Supreme Hold Hairspray. I have
 the 400ml one and it is HUGE, will last for ages aha. I've only used this a few times since I got it, and I have to say i'm liking it a lot! It holds volume really well, which is useful because my hair sometimes is soo flat and I often use volumising products on it and want them to last! Also it isn't really heavy and doesn't make your hair feel all greasy and weighed down, it's quite light and soft. It brushes out really easily too, and holds your hair in place naturally - it doesn't look stiff or like it's got any product in it at all! It comes in various sizes, so check out the smaller ones if you feel like testing it out, and is available at Boots (where else haha? I love Boots!).
Next let me introduce another of my favourite hair products - the Vo5 Heat Defence Taming Spray! Protecting your hair against heat is very important to prevent damage, and I
 find myself reaching for this product the most when it comes to straightening or blow drying my hair. It is a fine mist which doesn't dampen your hair, meaning no horrible *hissss* or burning smell once you put your straightening iron to your hair, and it keeps your hair feeling very light and like you've not got any hair products on. There's nothing worse than your hair feeling bogged-down by tonnes of product so I love anything that's light, especially as I do like to use a fair few products on my hair haha. This product also makes your hair look sleek and shiny, and reduces frizz.
Next up is one of my ultimate favourite products...which I think has been discontinued :(
The reason i'm posting it is because it is amazinggg, and if any of you guys know where to get this product then please let me know lol!! I'm running out and it's making me depressed :(
Anyway the product is called Citré Shine Shine Miracle Polishing Serum. It smells SO gorgeous and citrus-y and I apply a bit to my towel-dry hair after coming out the shower and it makes it smooth, sleek, glossy, shiny, totally frizz-free and makes my hair look and feel (and smell!) so healthy and good <3

The last product i'm going to mention is the Vo5 Extreme Style Surf Style Spray 1
 50ml. I went surfing in Devon and Cornwall this summer and loved the natural beach-waves and texture of my hair after surfing all day, it looked so cute down or up in a messy bun and plaited back fringe/bangs. I saw this product in Boots and decided to try it out! I'm so glad I did, because the texture it gives your hair is PERFECT beach-blown, wind-swept style, thanks to the sea salt in the product it feels like the real thing to me aha, perfect way to remind me of the summertime all year round :)
This product works really well on curled hair to make it really messy waves, or natural hair for lots of volume and a bit wavy (well on naturally straight hair that is, on wavy hair it'd look gorgeous!). This was £3.22
Well that's all for now!
Hope you enjoyed the post, and do you have any hair product recommendations? Comment with them below, i'd love to hear!! :)
Friday 1 January 2010
What eyeshadow colours suit your eye colour?
Hiya guys!
First of all, happy new year to all of you! Hope 2010 will be a good year for everyone :)
Now onto the main topic of this blog post...
What eyeshadow colours suit different eye colours?
I have med/dark brown eyes and although they suit my warm toned face I always thought they were so boring - I always wanted green eyes to go with my dyed auburn hair...i'll show you some pics I edited of me with 'green eyes' at the end of this post haha.
Anyway I decided to do some research on which eyeshadow colours really made my eye colour pop and made it more interesting, and then I thought it would be interesting for a lot of people sooo I decided to make a blog post on what I found out :)
Brown eyes
One colour I love to wear with my brown eyes is purple!
It's said to go well with dark or olive skin tones, so perfect with my olive skin, and it complements my hair colour as well.
Gold and green are recommended for lighter brown eyes as they are said to pick up the coloured flecks in your eyes. This would work well with hazel coloured eyes too :)
For dark brown eyes, a royal blue is said to look good -but not too dark otherwise your eye area will look quite dim and dull. Try experimenting with different shades of blue - here's a really cute pic I found from google:

Blue eyes
For those with blue eyes (lucky people!) a whole variety of shades are recommended.
Most blue eyes are cool toned, so colours like grey, silver and taupe will look good with virtually any blue eye.
Purple and violet are also recommended for blue eyes. Vibrant purple can contrast beautifully with blue, but be warned it may make your face look washed out so stick to lighter shades if this is the case.
One little trick I stumbled upon during my research was that apparently if you use a deep shade of blue darker than your eye colour it brings out the blue tones in your eyes, making them look more vibrant!
More pictures found on Google:


Green eyes
Those blessed with green eyes (lucky people!) might have warm eyes (green and a bit of brown) or cool eyes (greeny bluey eyes), so different eyeshadow shades will suit slightly different shades of green eyes.
For those with warm green eyes, earthy colours such as brown, green, gold, bronze and copper will complement their colour well.
For those with cool green eyes, shades similar to those suiting blue eyes will look good - anything in the red/purple family is also recommended; mauve, rusty colours, plum etc.
The same trick for blue eyes can be used for green, by using a slightly darker green shade of eyeshadow to make your eyes look more green and vibrant.
Again, here are some pics from Google!


Hope you enjoyed the post!
Finally, here are some pics of me with edited green eyes haha, I want!!


Subscribe to:
Posts (Atom)
